Exploring Container Images For Fun and Profit
A Container of What?
If you are familiar with containers, then you’ve probably heard them described as a way to bundle an application and its dependencies. Running an application as a container starts an isolated process or group of processes1 on a host using a bundle — the container image. The container image is the actual bundling of the application and dependencies. What are container images really made of though? How are they made even made? How about we go poking at container images to see what we can learn!
A Zip of Zips With Some JSON Spice
A container image is an archive bundle of zip files and metadata arranged in a specific way2. To demonstrate what this means in practice, let’s examine the image for the Grafana visualization tool. Grafana is an open source analytics and interactive visualization application that can be deployed as a container. The docker pull command pulls down the image from DockerHub. We then use Skopeo3, an open-source command line tool, to convert the image to the Open Container Image (OCI) format. 4
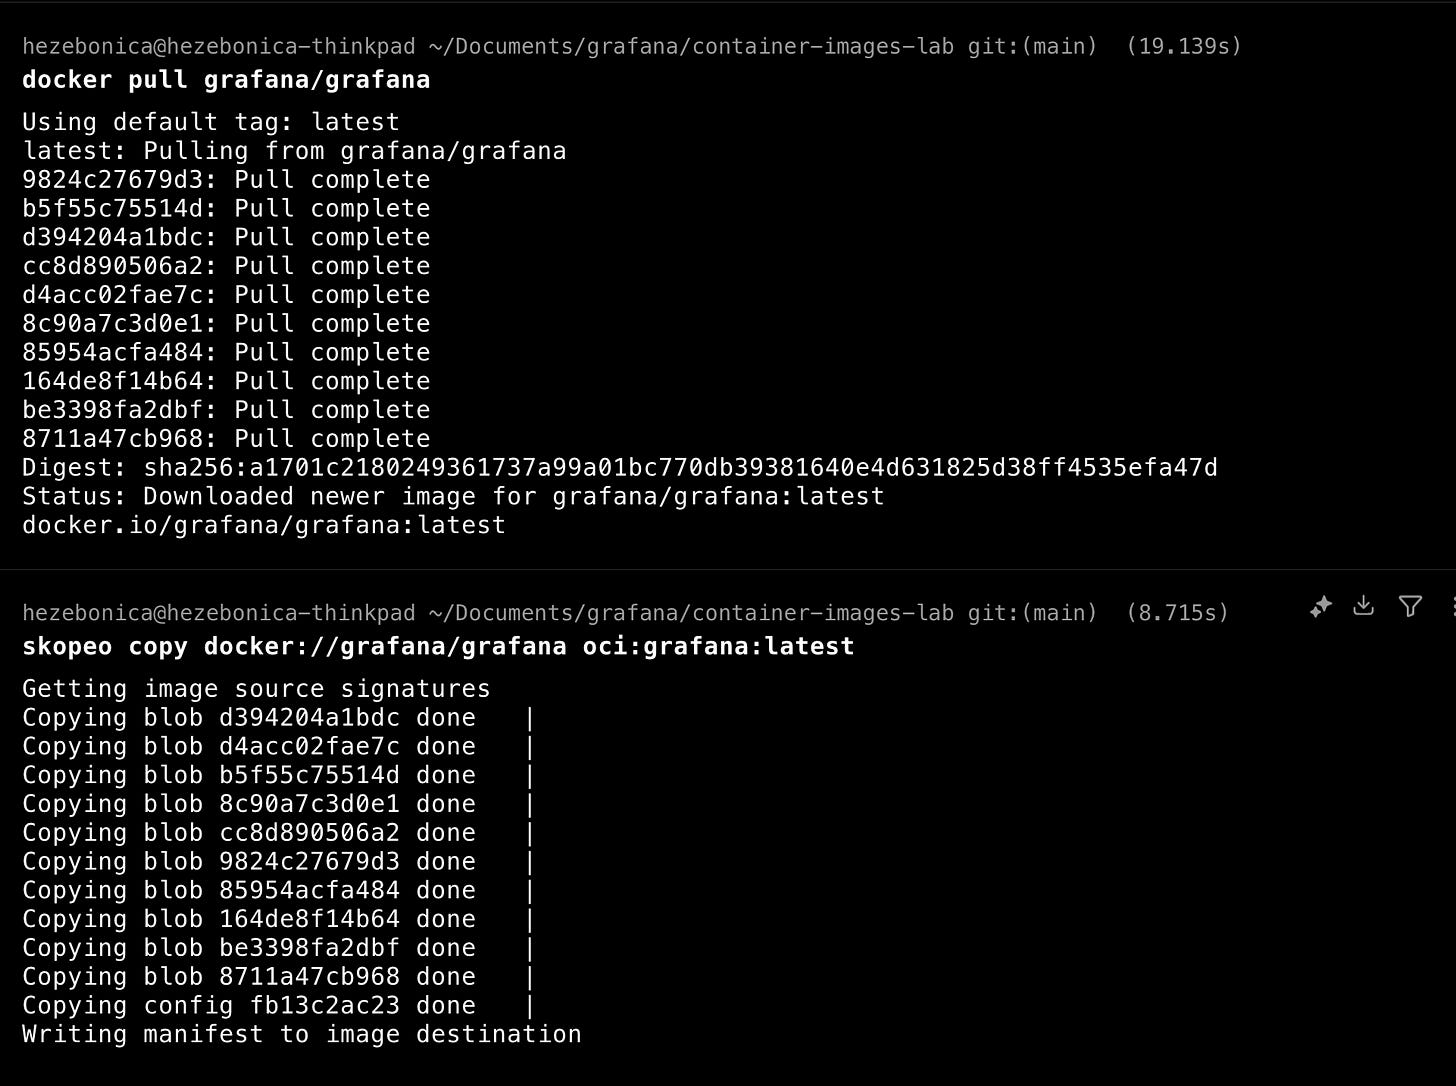
Using docker to pull the grafana/grafana image and converting it to OCI format using skopeo
In OCI format, the container image consists of a couple of text files and a directory of blobs.
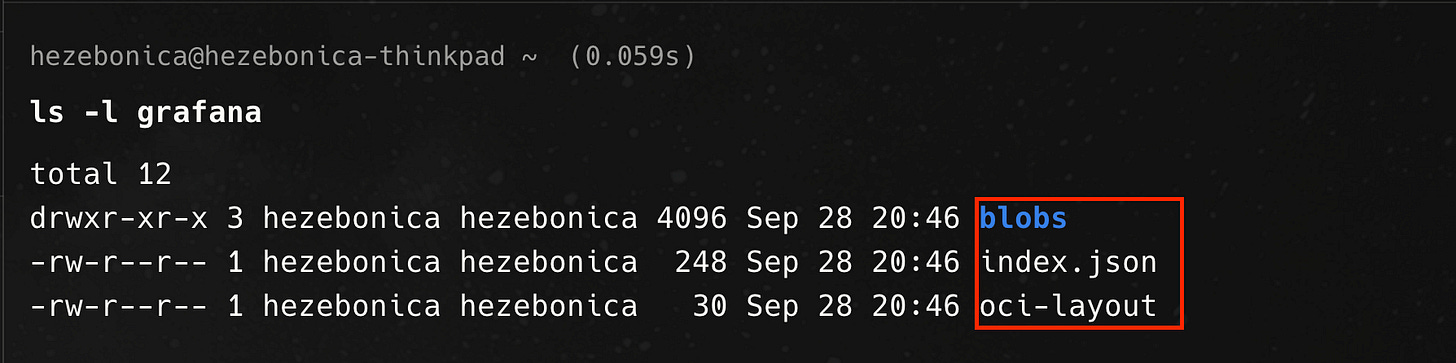
Directory listing of the oci image format produced by Skopeo
oci-layout is a JSON file. Its content identifies the image layout as version 1.0.0 of the OCI Image Layout Specification. Index.json file is also a JSON file and contains information pointing to other parts of the image as defined in the OCI Image Layout spec. The manifest entry in index.json points to an image manifest by its sha256 hash (digest). Let’s see if we can find the actual manifest file using this hash.
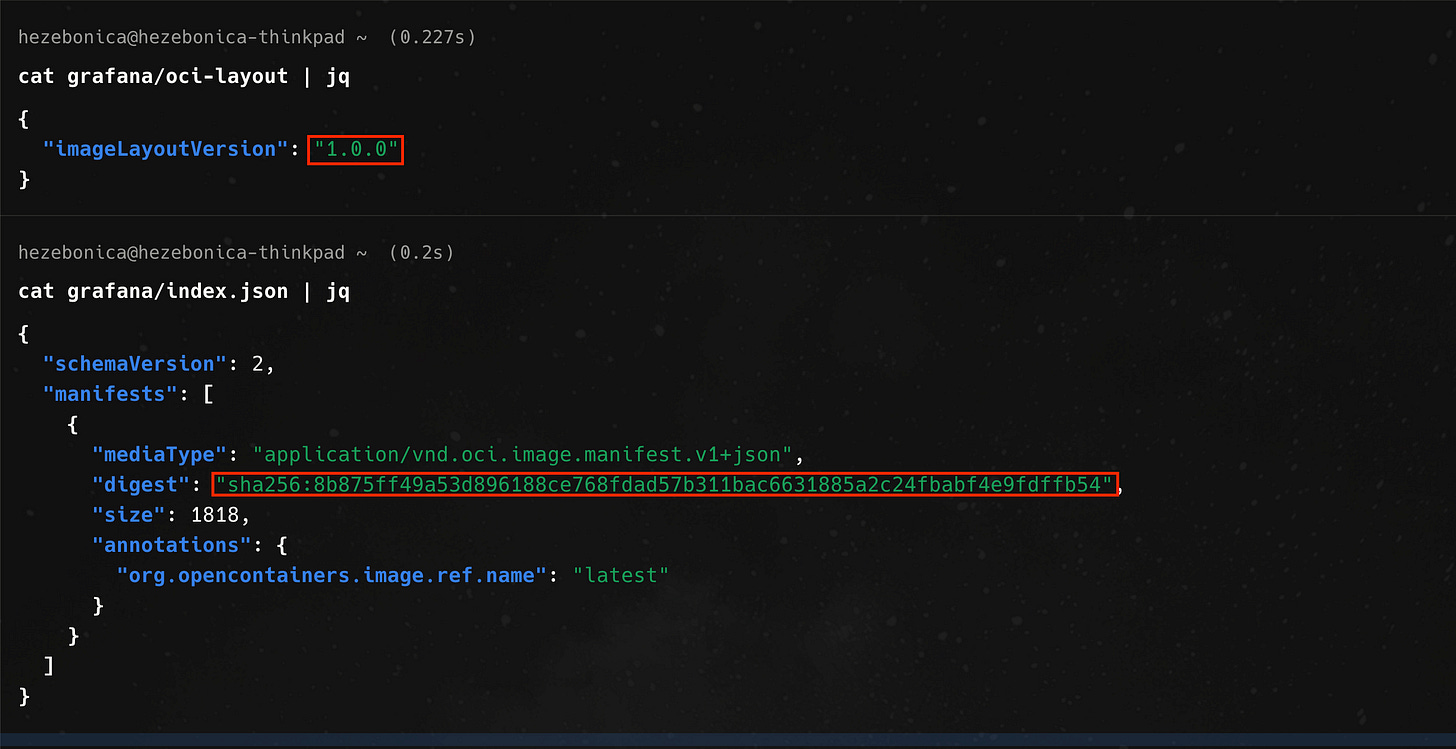
JSON contents of the oci-layout and index.json files
Inside of the blobs directory, there is a single subfolder, sha256. The files in this subfolder are named by the sha256 hash of their contents.
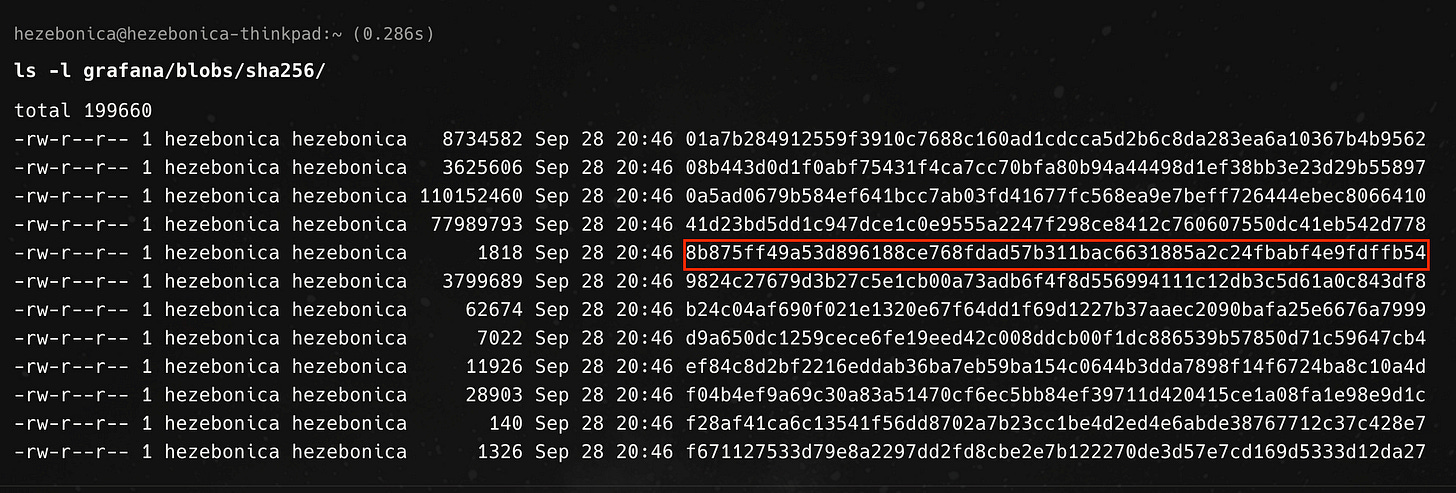
Files in the sha256 subfolder inside the blobs directory

Each file in the sha256 directory is named by the hash of its contents
The digest of the manifest in index.json (manifest.digest) corresponds to one of the files in the sha256 directory (blobs/sha256/). Viola! This is the image manifest. This file is JSON and refers to an OCI image config file (config.digest), as well as an array of layers, each of which is a tar gzip5.
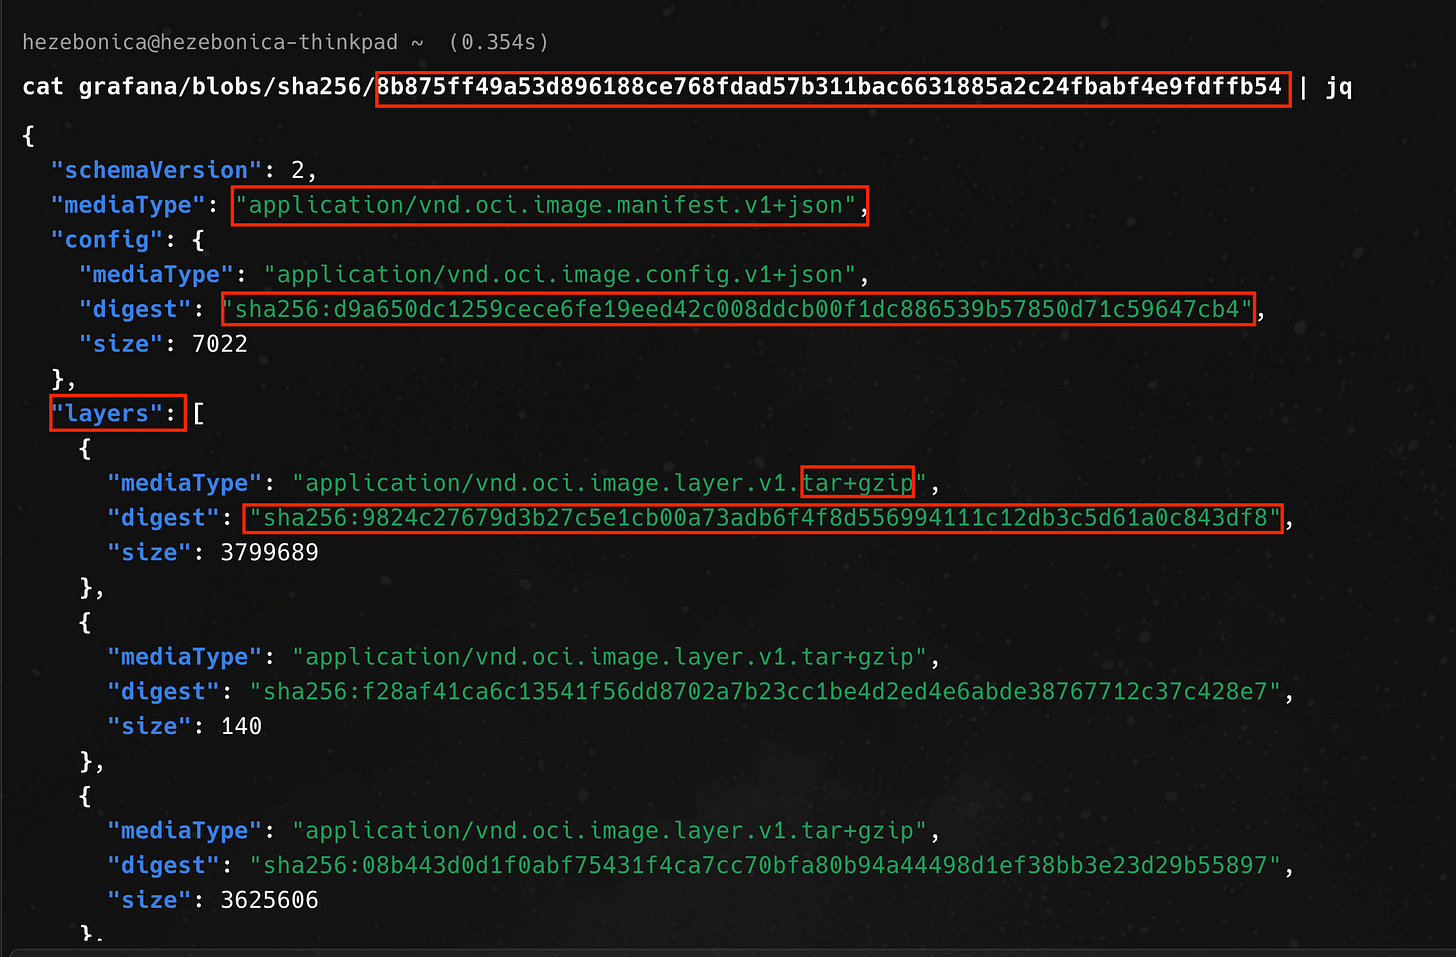
The contents of the mainfest, including the image config and layers
The OCI image config contains the default configuration options for running the Grafana application container. This includes the user, exposed ports, environment variables, entrypoint, and reference to a root file system. You can already infer a lot about the default runtime behaviour of Grafana by looking at this file.
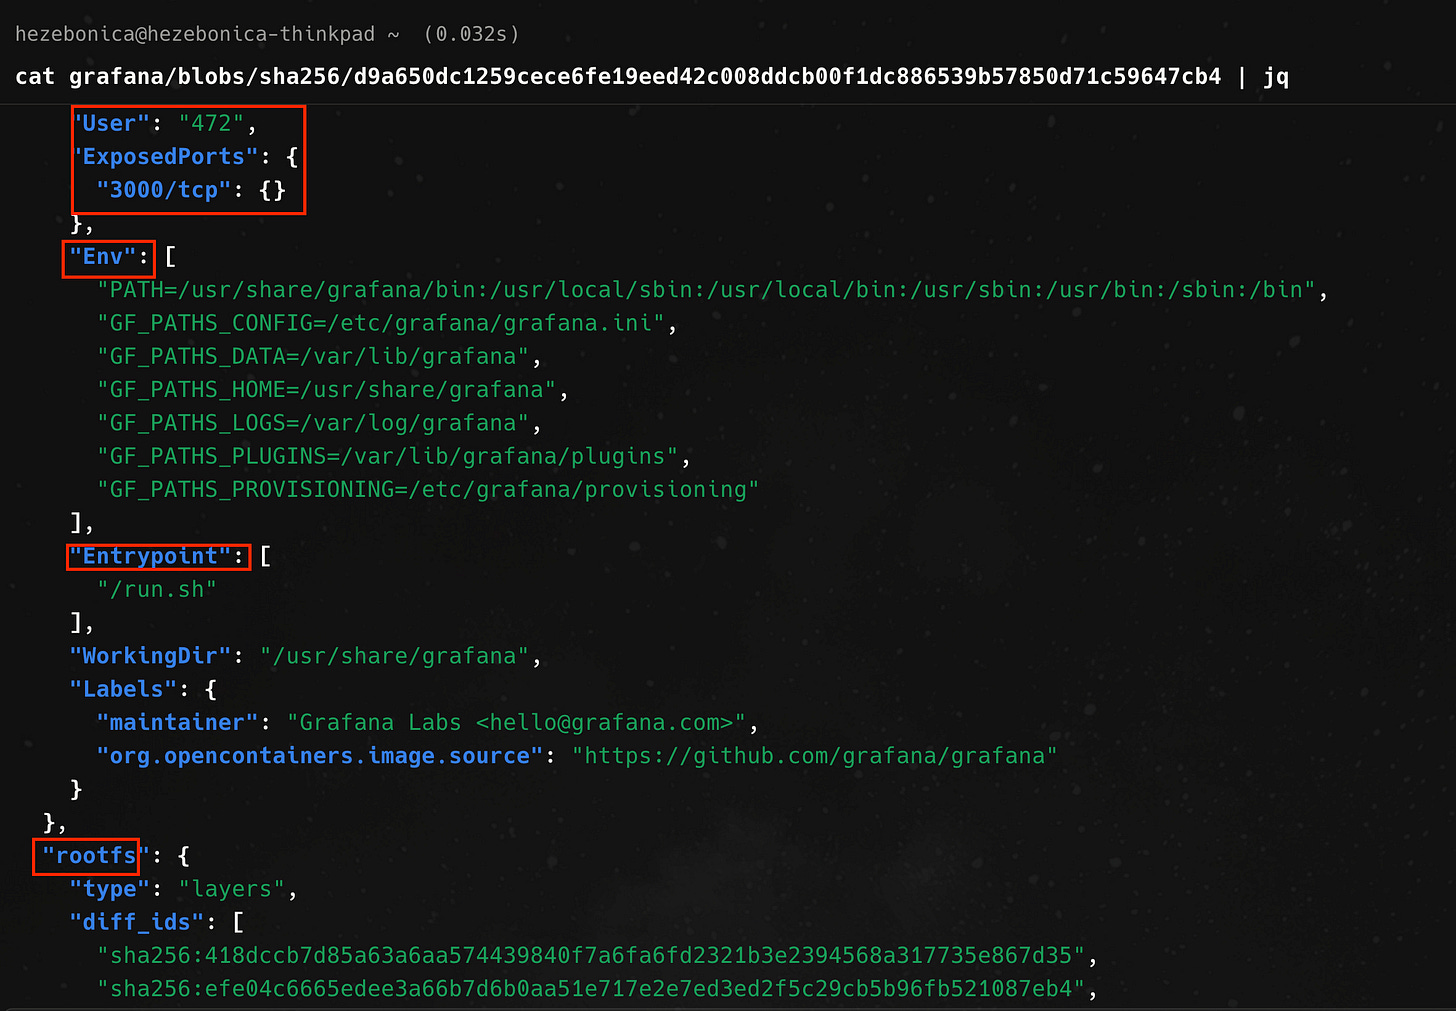
The image config file includes the default configuration options for the Grafana application
Each layer in the manifest corresponds to one of the files in the blobs directory. The contents of the first layer with sha256 hash of 9824c27, seem to be a complete Alpine Linux filesystem. This layer is the base image.
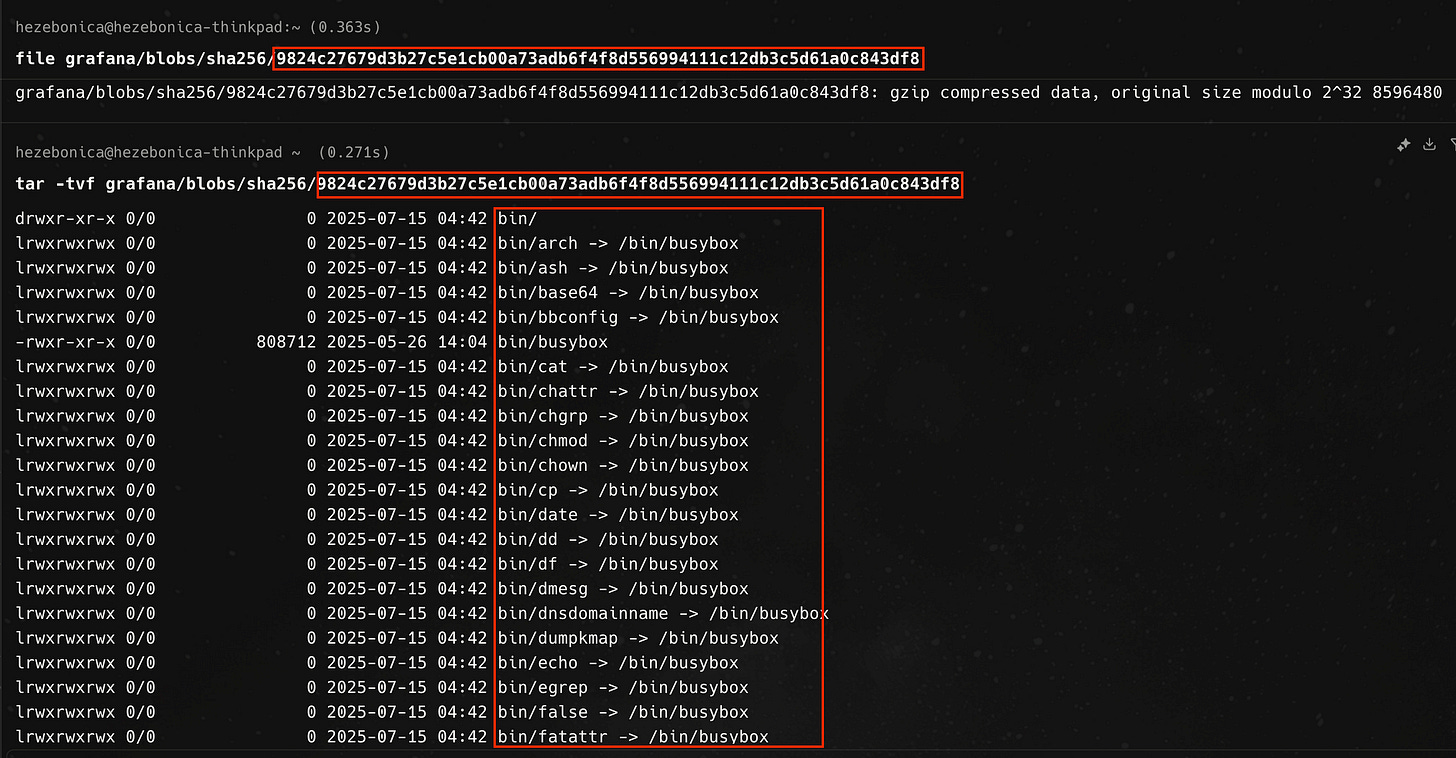
The first layer is a gzip file that seems to be a complete Alpine Linux filesystem zipped up
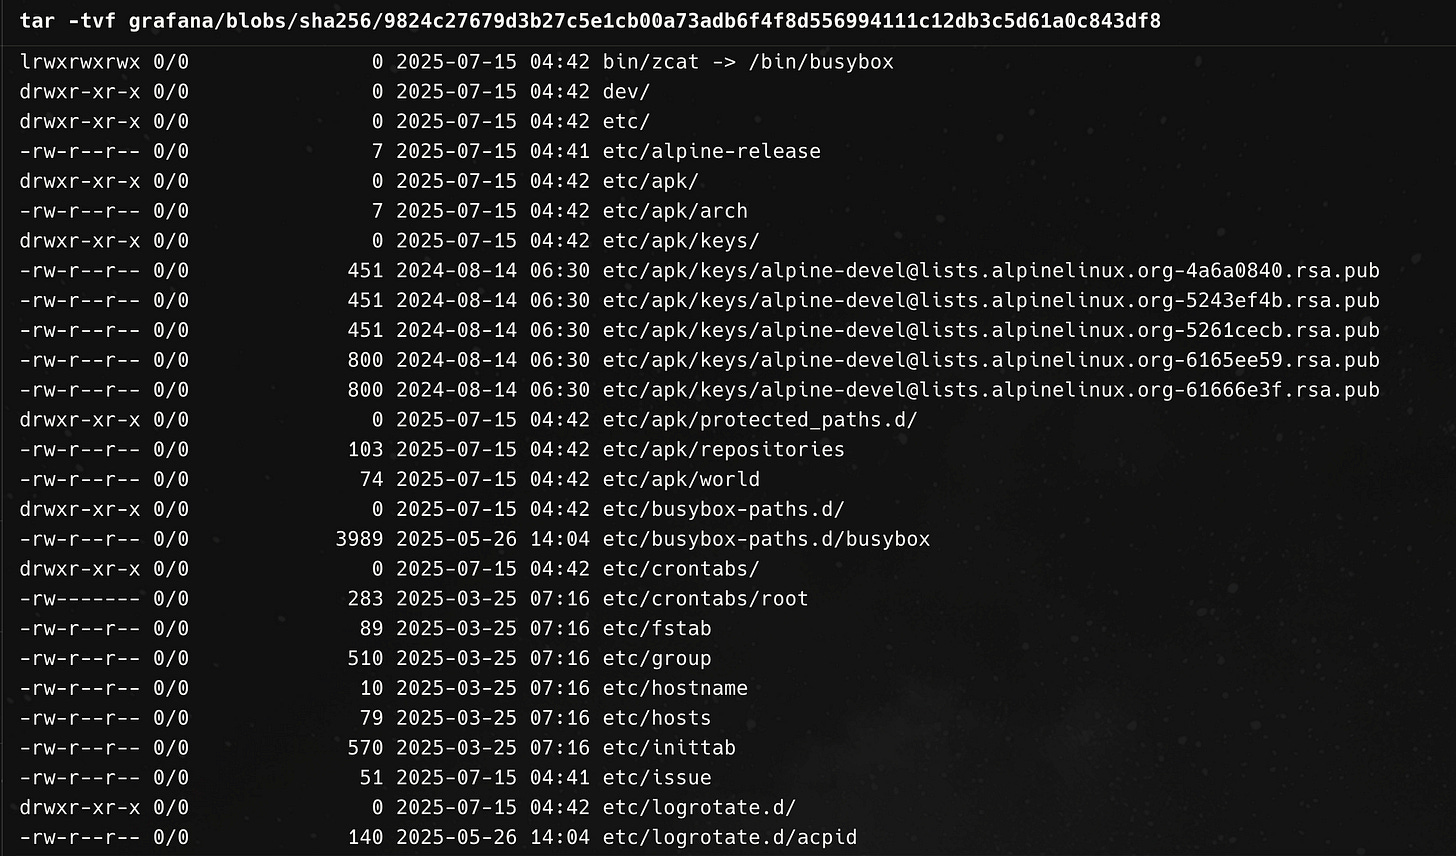
Parts of the filesystem in the base Alpine Linux image
Where do these layers come from and how did they get into the image? Perhaps, we should build a Grafana image of our own in search for clues!.
Building Container Images
The layers in a container image come from the way images are built. The most popular way to build a container image is using a Dockerfile, which specifies commands and configurations for the image. A container image build starts with a parent image specified in a FROM directive. Each step in the build process can then produce a new layer on top of the parent. Each layer contains only the changes to the filesystem resulting from the specific build step.
Let’s build a Grafana container image using the Dockerfile from the public repository. After cloning the repository locally, we build the image from the Dockerfile by running the docker build command. Passing the -t flag gives the container image a specific name, grafana-my-build, to allow us to easily identify it afterwards.
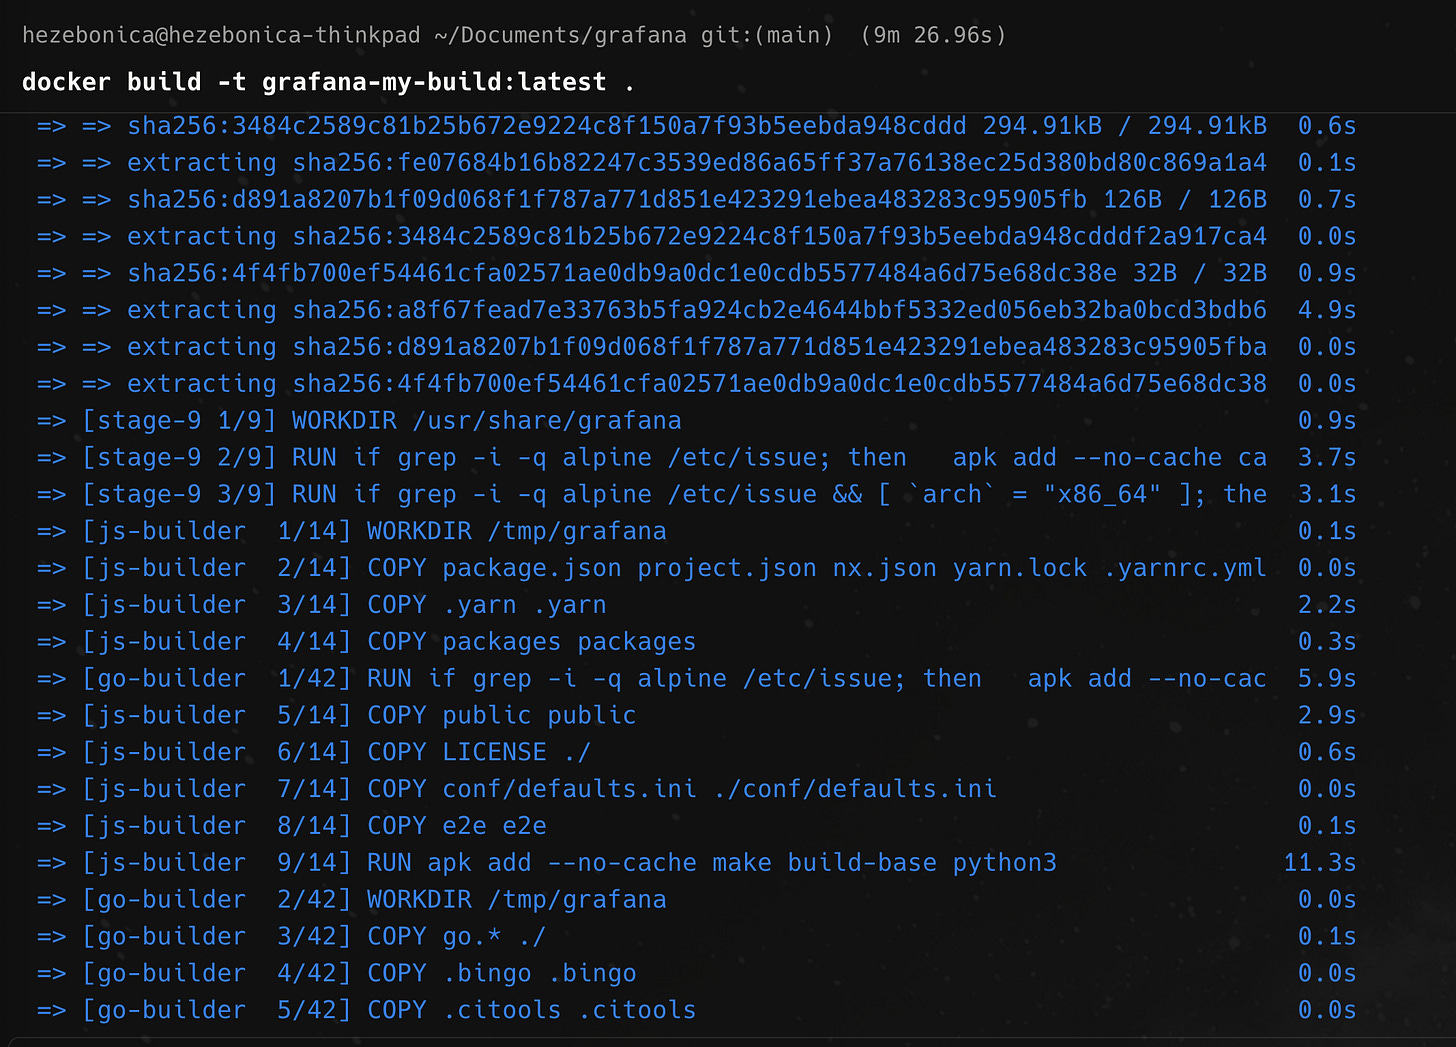
Building a Grafana image from the repository’s Dockerfile using Docker build
As Docker builds the image, each directive in the Dockerfile either modifies the filesystem or the configuration6. The log output from the build shows each step on a separate log line that also includes the amount of time the step takes to complete. A directive that modifies the filesystem will add a new layer to the image and will take longer to complete, on average.
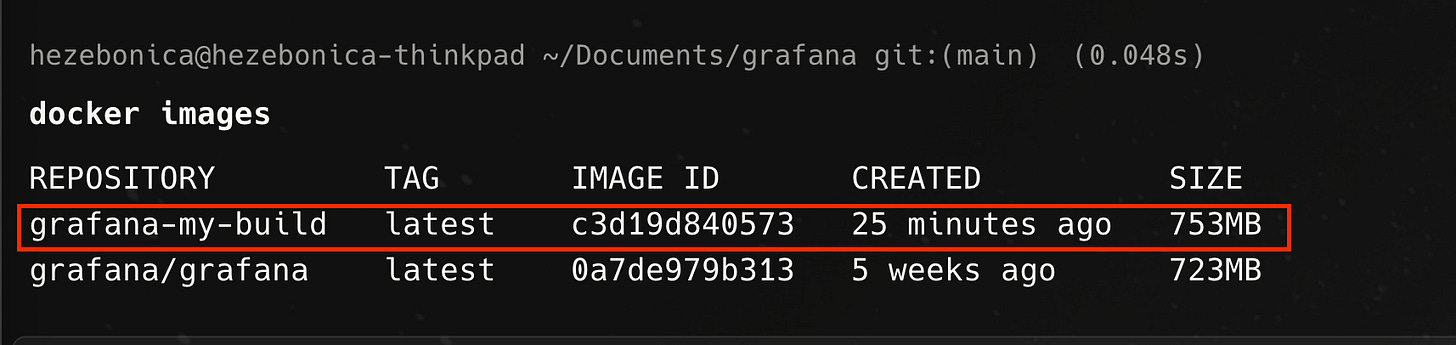
The Grafana image after the build with a custom name
If we ran an instance of the image and connected a shell to it with the docker exec command, we see a unified filesystem that looks like a typical Linux filesystem, despite the image being composed of multiple layers. How do all the layers in the image get squished into a unified filesystem at runtime? Time to introduce overlay filesystems in Linux!
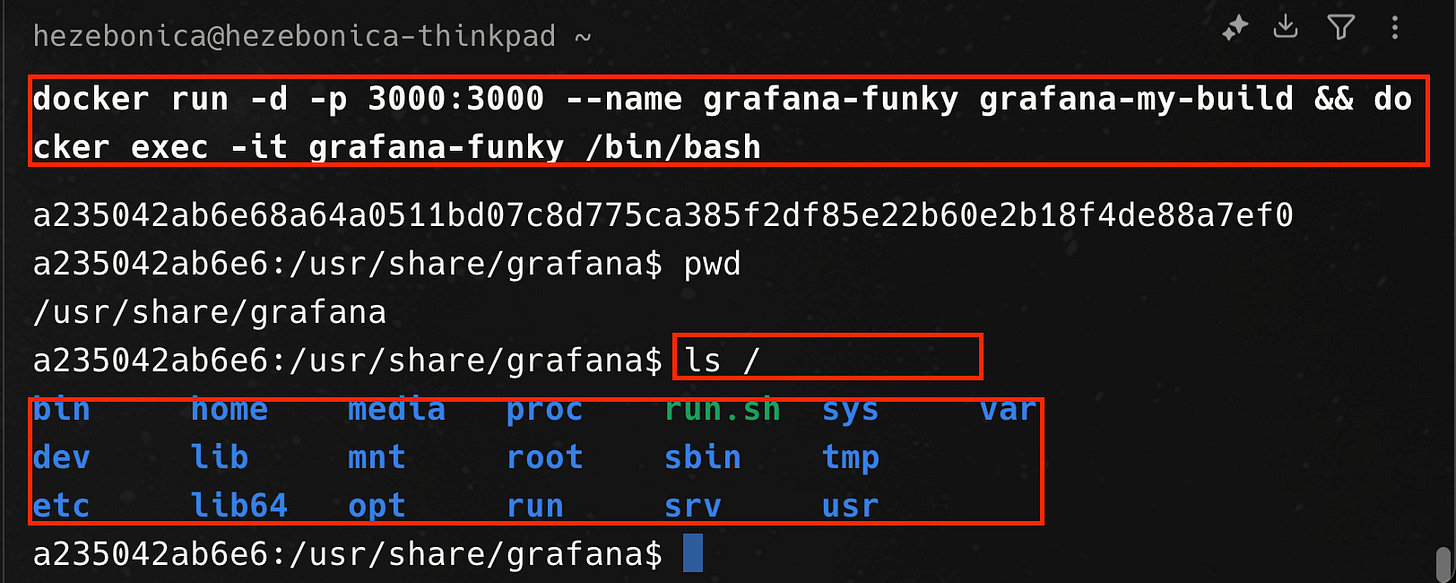
Running and connecting to the container; we are presented with a unified filesystem
Layering On With Overlay Filesystems
If we take a peek inside the filesystem of a running container, we would see what looks like a single filesystem, with all the layers merged together. If we run multiple containers from the same image, we see an independent filesystem in each one. Changes in one container do not affect others. Overlay filesystems make all of this possible.
An overlay filesystem is a type of union filesystem that combines multiple filesystems or layers into a single, unified view. It consists of three components; a number of lower directories or lowerdir, an upper directory upperdir, and a work directory workdir.
The lowerdir is a read-only base layer containing the original files and directories that are the foundation of the overlay. Multiple lower directories can be specified and if so, are stacked in the order they are provided. The upperdir is the writable layer where any changes made to the filesystem are stored, without altering the data in the lower layers. When a file is modified, a copy of the file from the lower layer is made to the upper layer, and the changes are applied there. This is known as copy-on-write7. The workdir is used by the overlay filesystem to ensure changes to the mount directory where the layers are combined are atomic, i.e. changes appear all at once.
Let’s see overlay filesystems in action by creating one on a Linux host. We first create four directories in the /tmp folder and then write some text file to both the upper and lower directories.
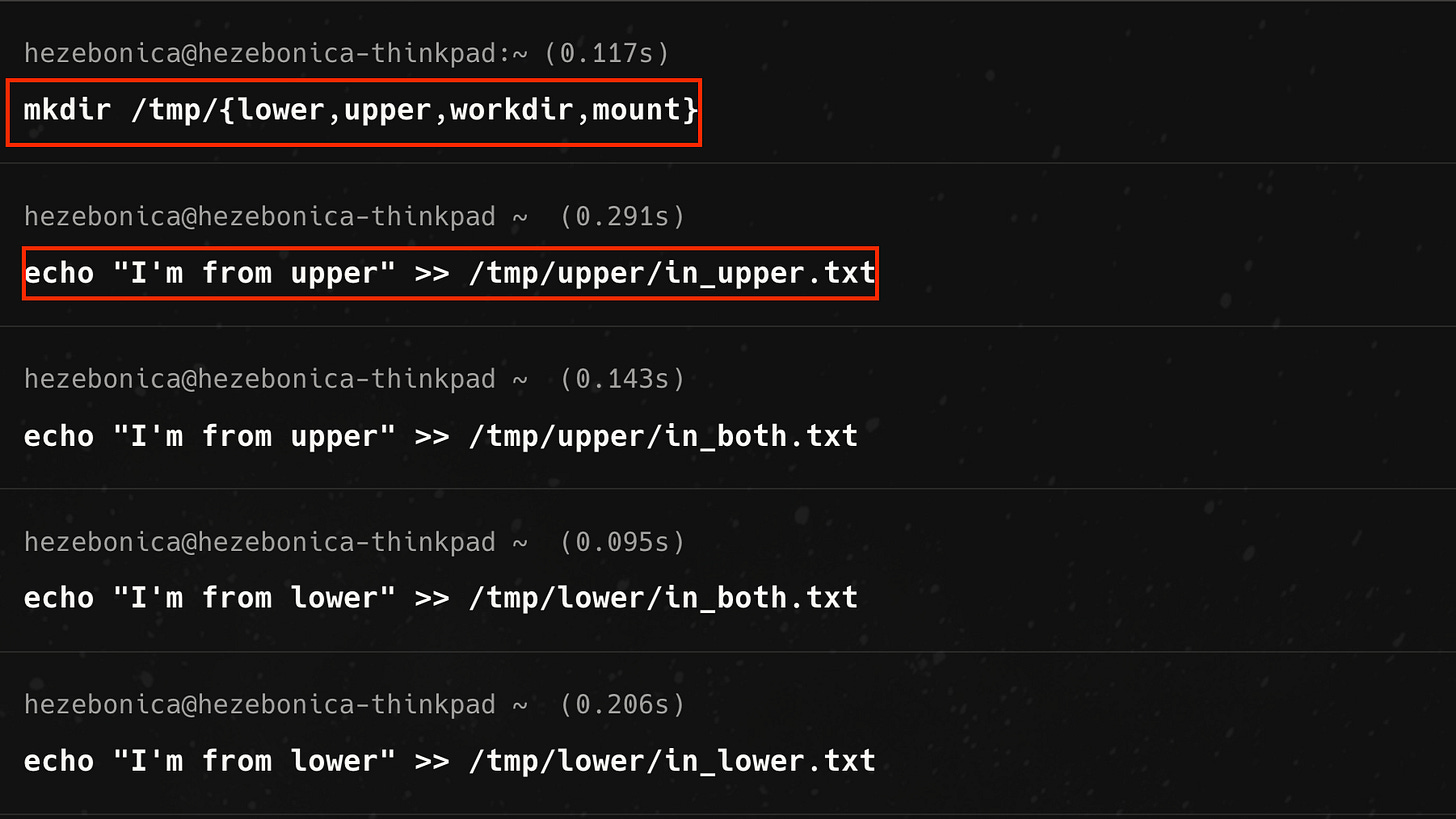
Creating directories in /tmp and writing some text to files
We then run the mount command with the -t overlay option to create an overlay filesystem. Afterwards, /tmp/mount/ contains the merged content of the upper and lower directories. There’s one each of the files that exist in only the upper and lower directory, but also one copy of the in_both.txt file that was written to both directories.
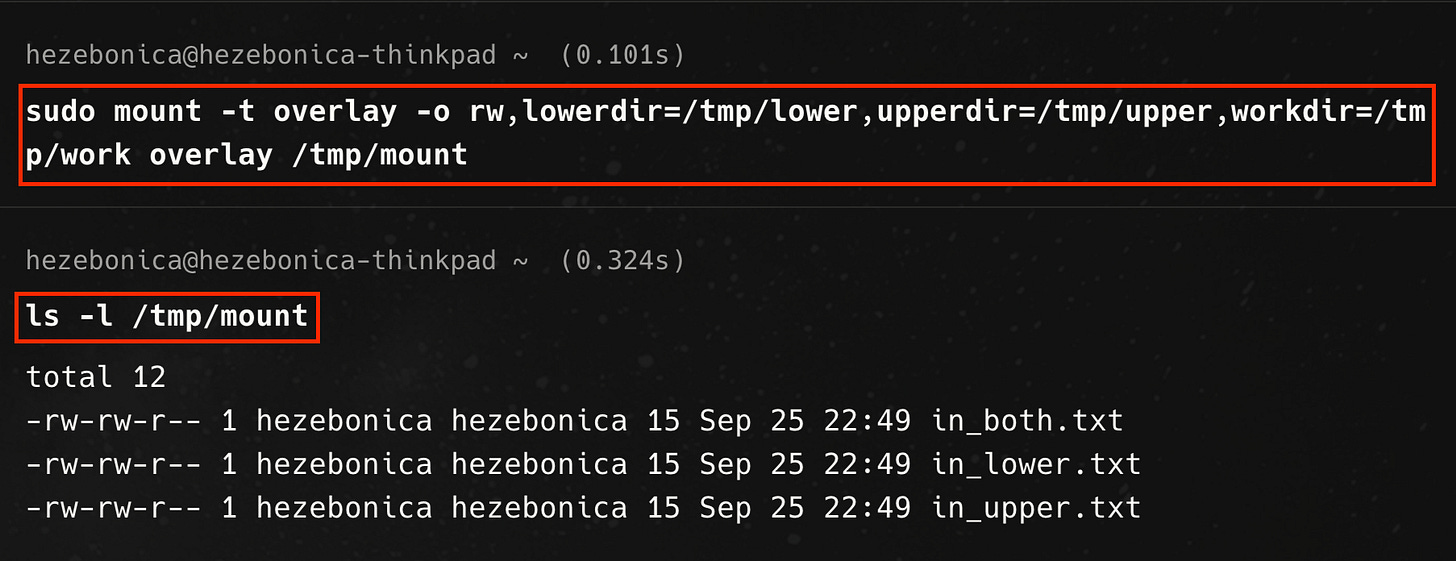
Create an overlay filesystem at /tmp/mount and list its contents
/tmp/mount/in_both.txt contains the text from /tmp/upper/in_both.txt. The mount filesystem has overlaid the contents of the upper directory on top of the lower directory.
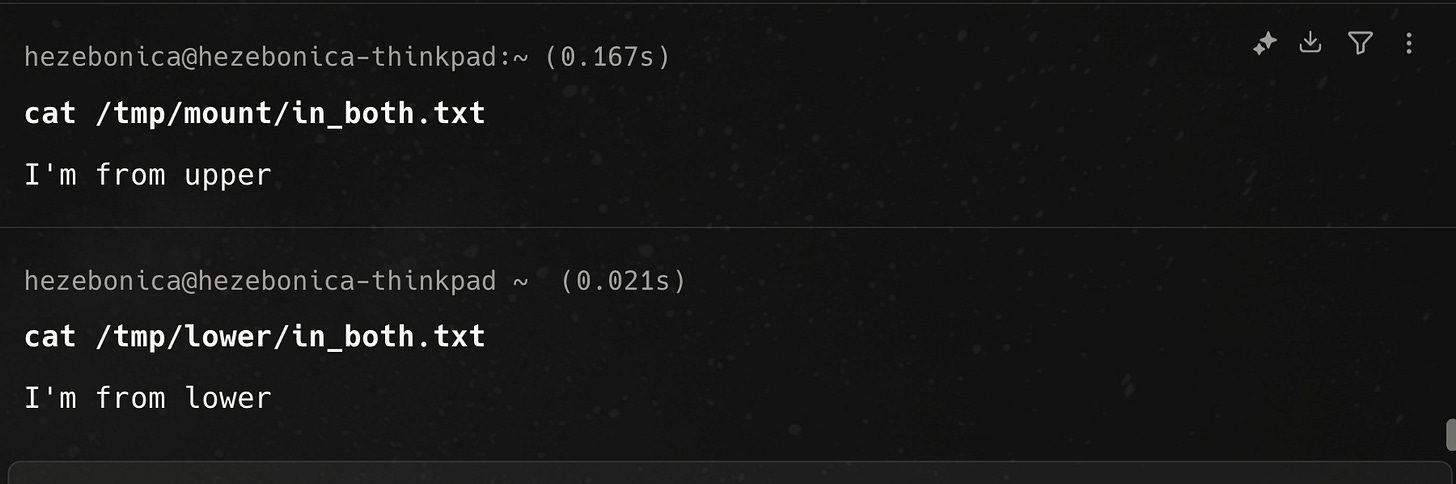
In\_both.txt is the overlay of the upper directory over the lower directory
Any changes made to the mount directory are actually made in the upper directory. For example, if we create a new file in /tmp/mount, it is actually created in /tmp/upper
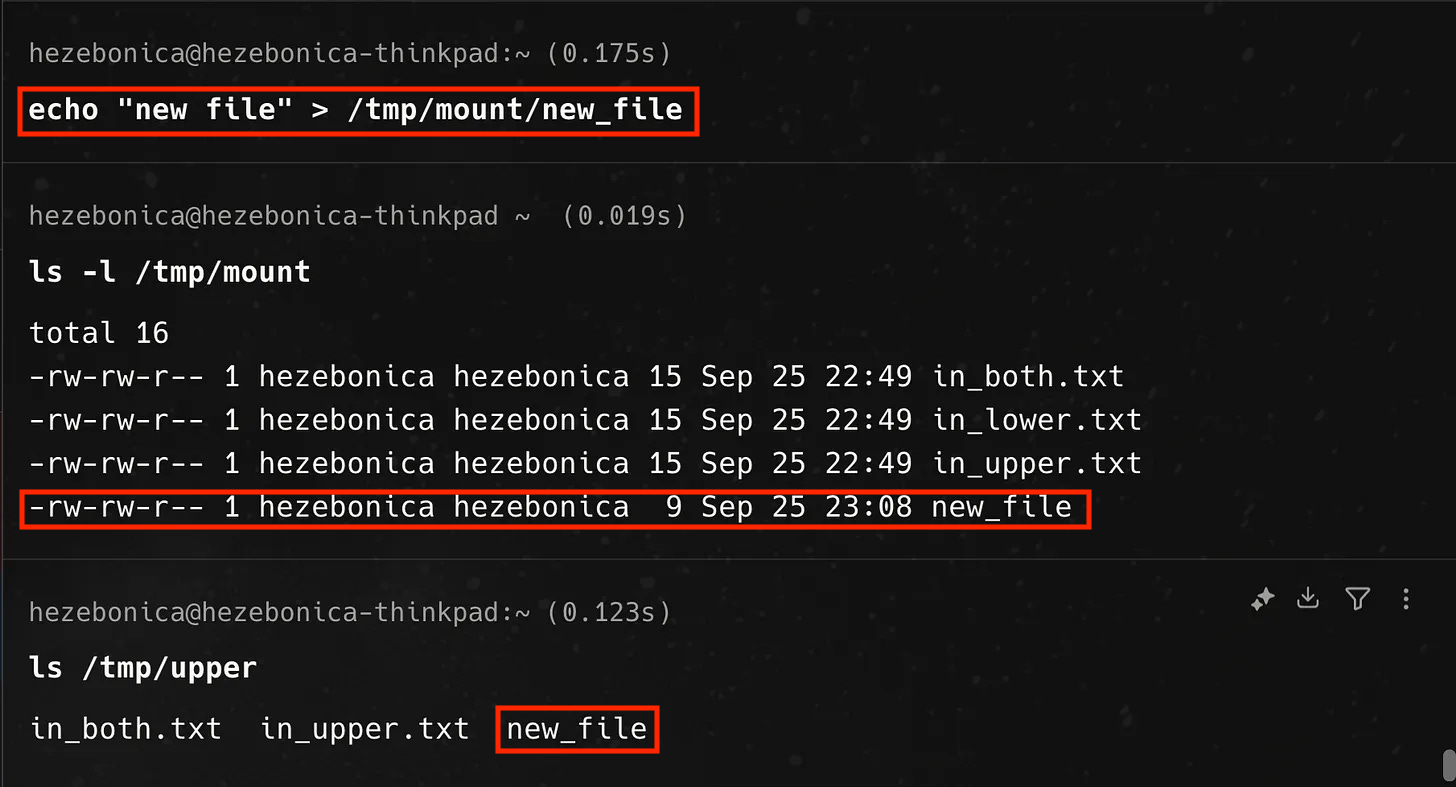
Creating a new file in /tmp/mount actually creates it in /tmp/upper
This also works similarly for deletions. Any deletions we make are made in the upper directory but the lower directory remains unchanged. Deleting /tmp/mount/in_both.txt merely adds a deletion marker to /tmp/upper/, but /tmp/lower/in_both.txt remains unchanged.
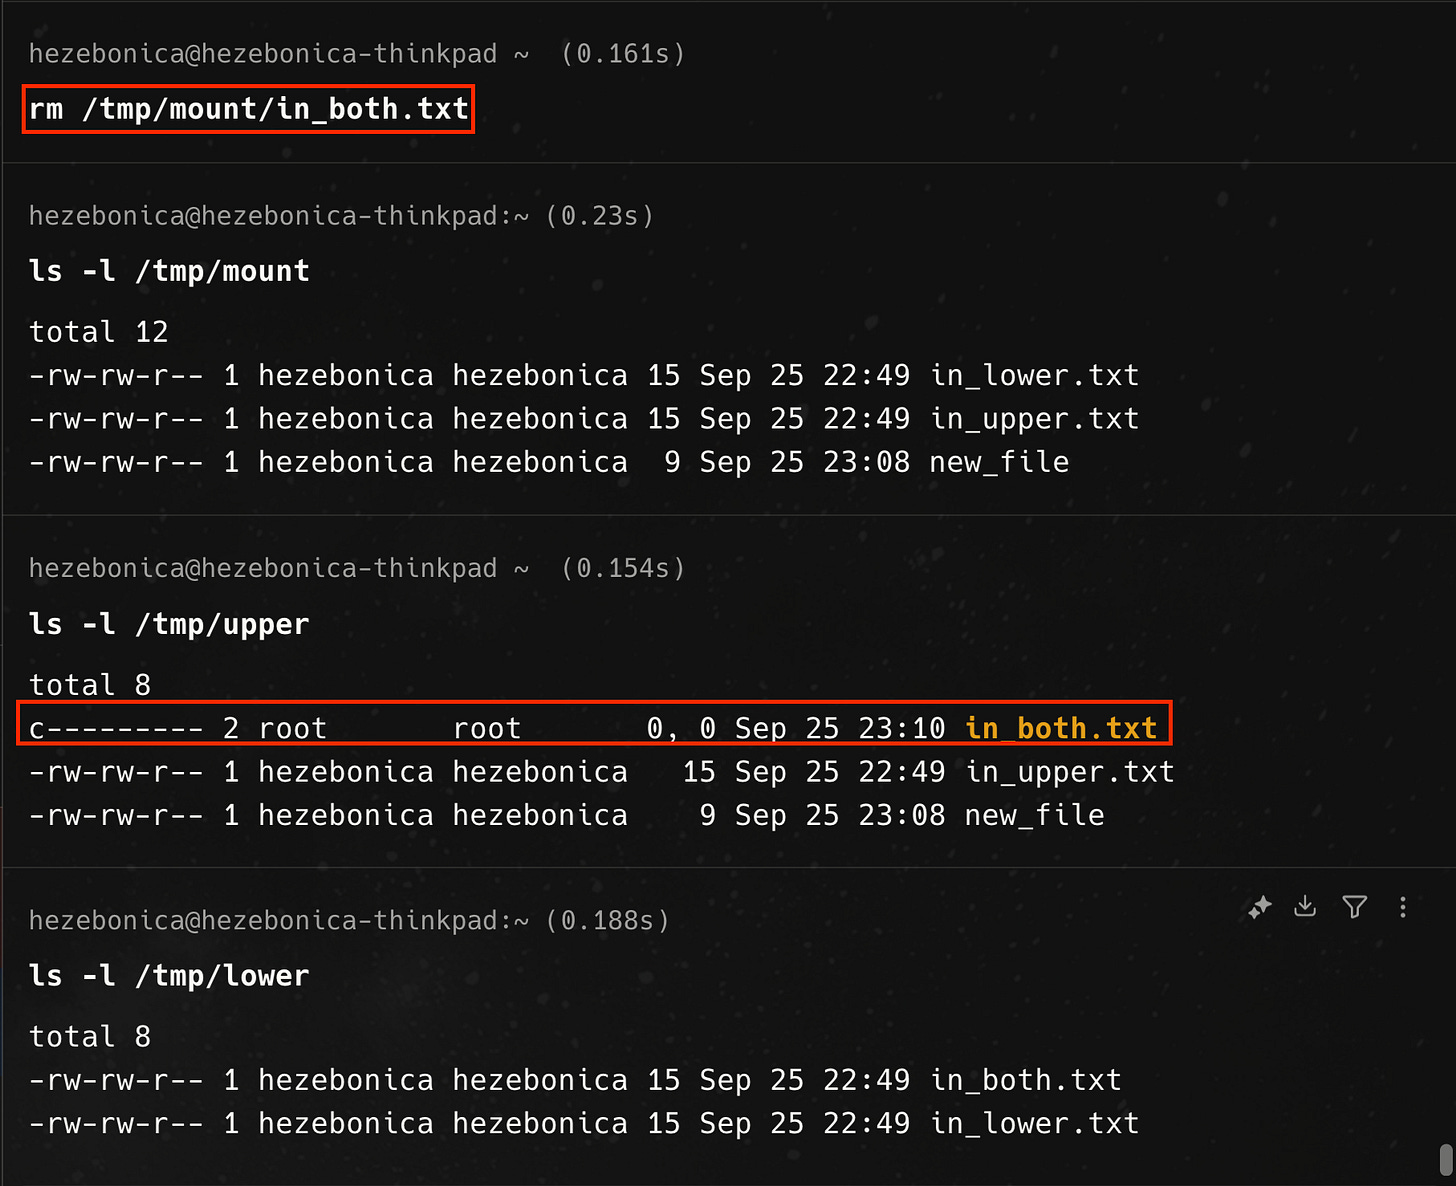
Deleting a file does not affect the lower directory
Multiple overlay filesystems can share the same lower layers with separate upper layers where changes are made without cascading down to the lower layers. To demonstrate this, we create a new overlay filesystem using /tmp/lower along with a new upper directory, /tmp/upper2. In this case the contents of /tmp/mount2/in_both.txt is from /tmp/lower/in_both.txt The deletion made to /tmp/mount/in_both.txt has not affected it.
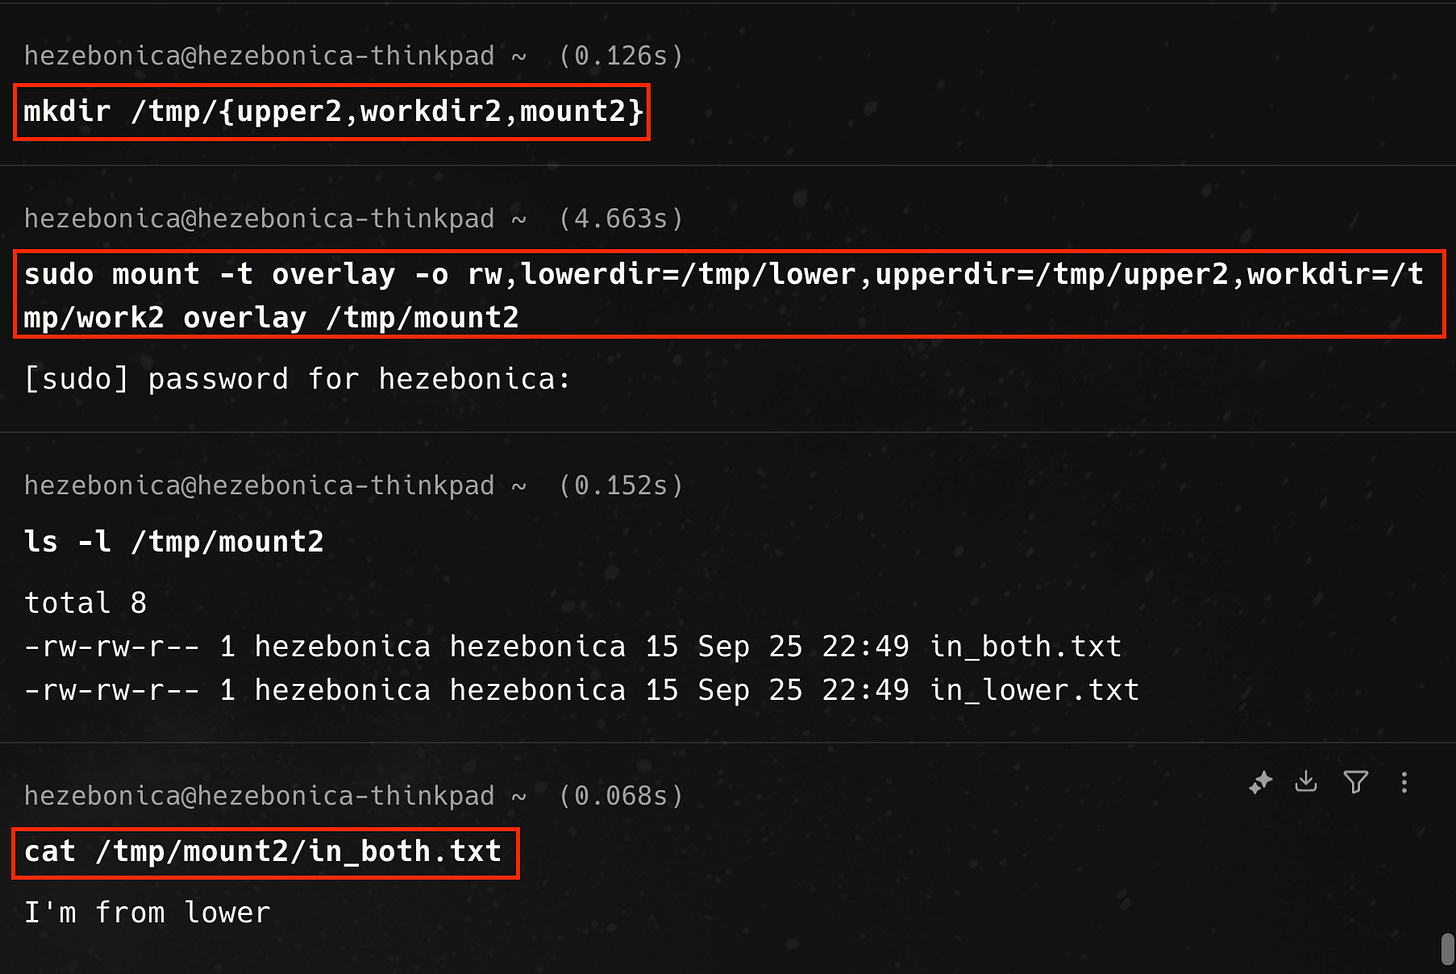
Reusing lower layers between two filesystems
This ability to share lower layers between multiple filesystems allows the efficient re-use of layers between container images without each image needing a separate copy of every layer.
Squishing it Together: Layers at Runtime
So, here’s what we know so far — container images are a zip of zips and images are typically built using a Dockerfile in a layered way. Overlay filesystems enable multiple layers in an image to be combined into a unified filesystem at runtime. But what does this combining together of layers actually look like from the perspective of the container runtime? We can run an instance of grafana-my-build and see for ourselves!
The docker run command will run the container. We can then probe into it using the docker inspect command.
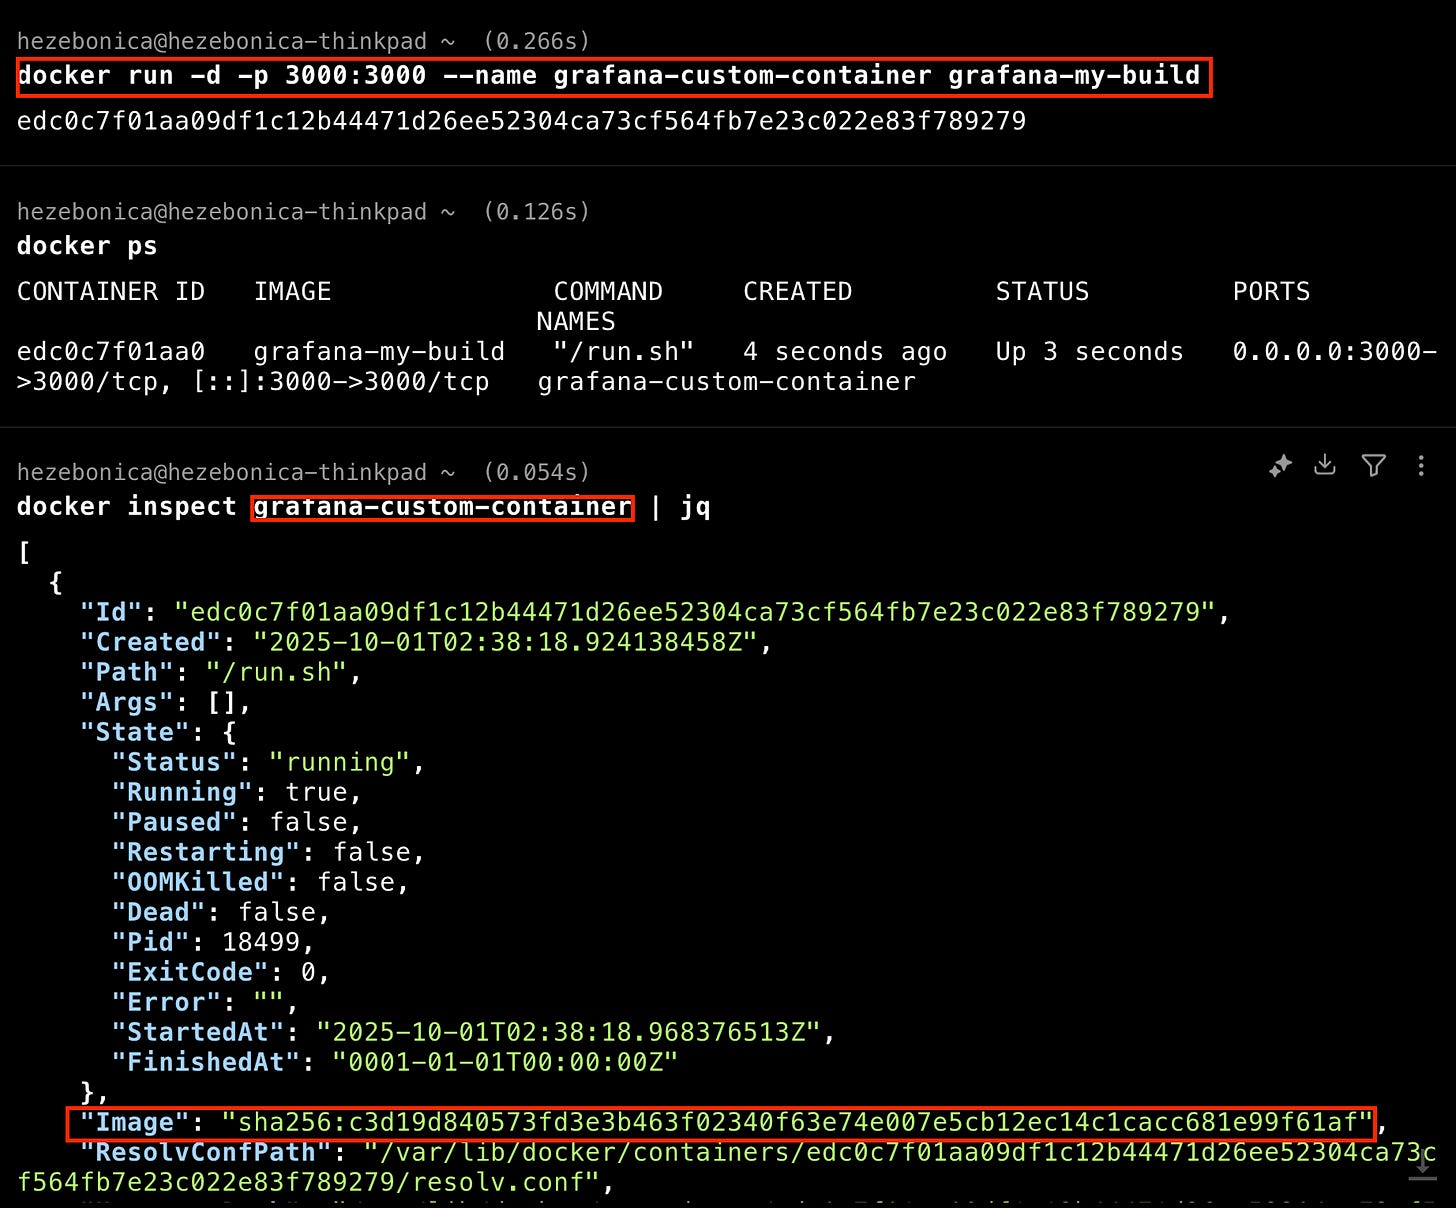
Docker inspect returns various low-level information on Docker objects. In this case, we are inspecting a running container. The Docker engine has a graphdriver that manages how the layers in an image are combined at runtime. We can ask the graphdriver about the layers it has combined by querying the GraphDriver.Data.MergedDir field of the output.
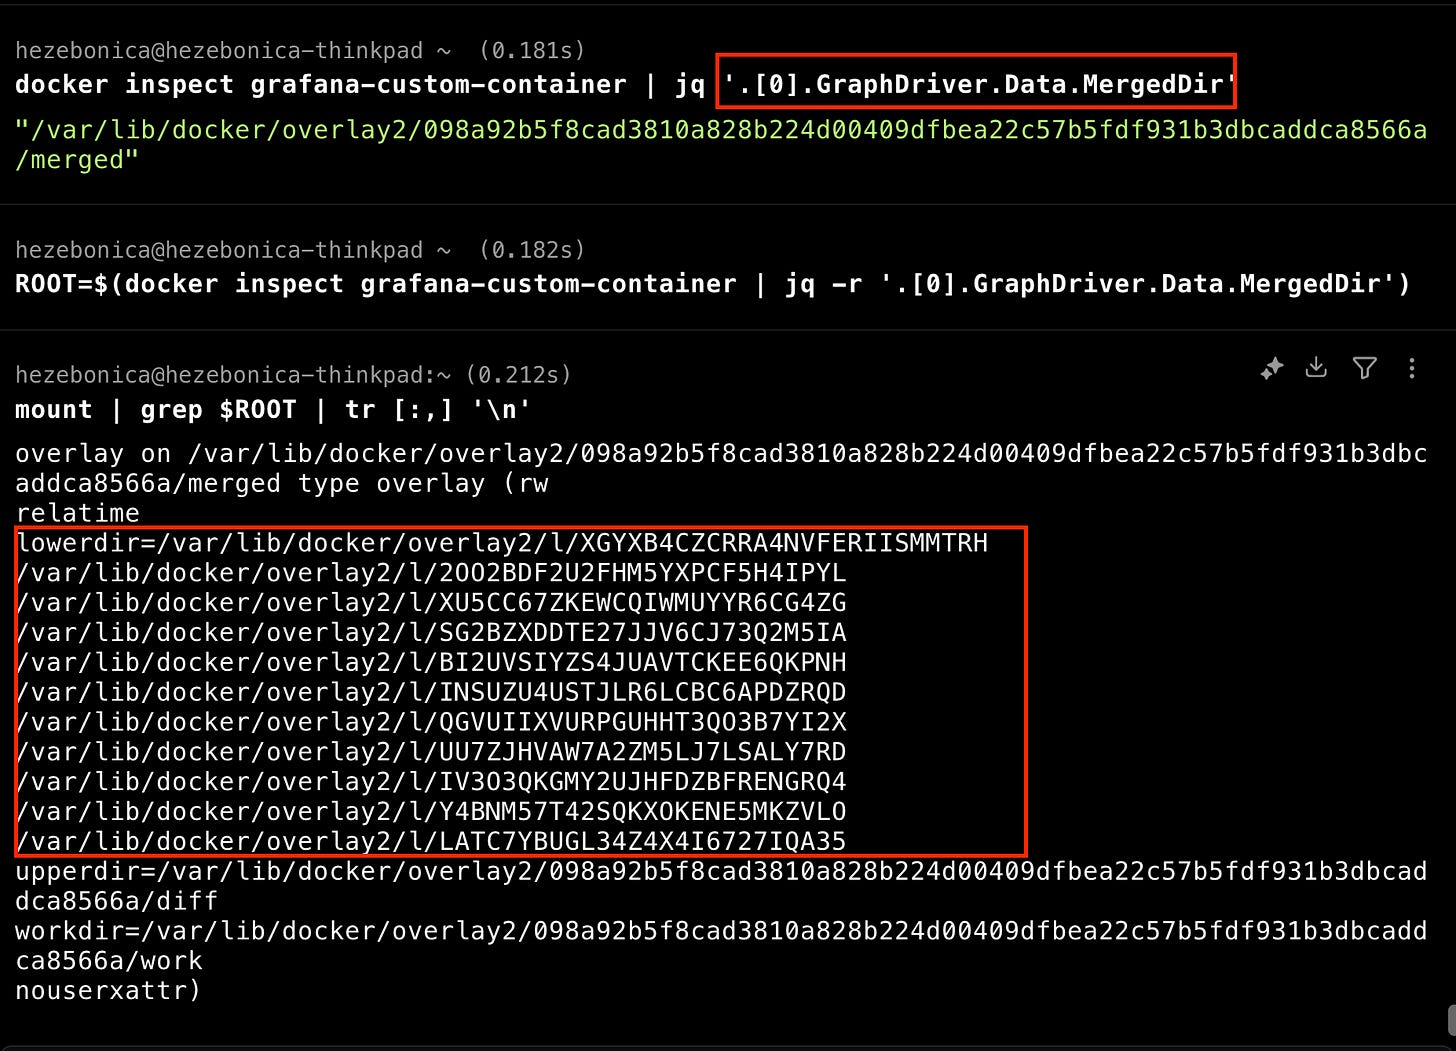
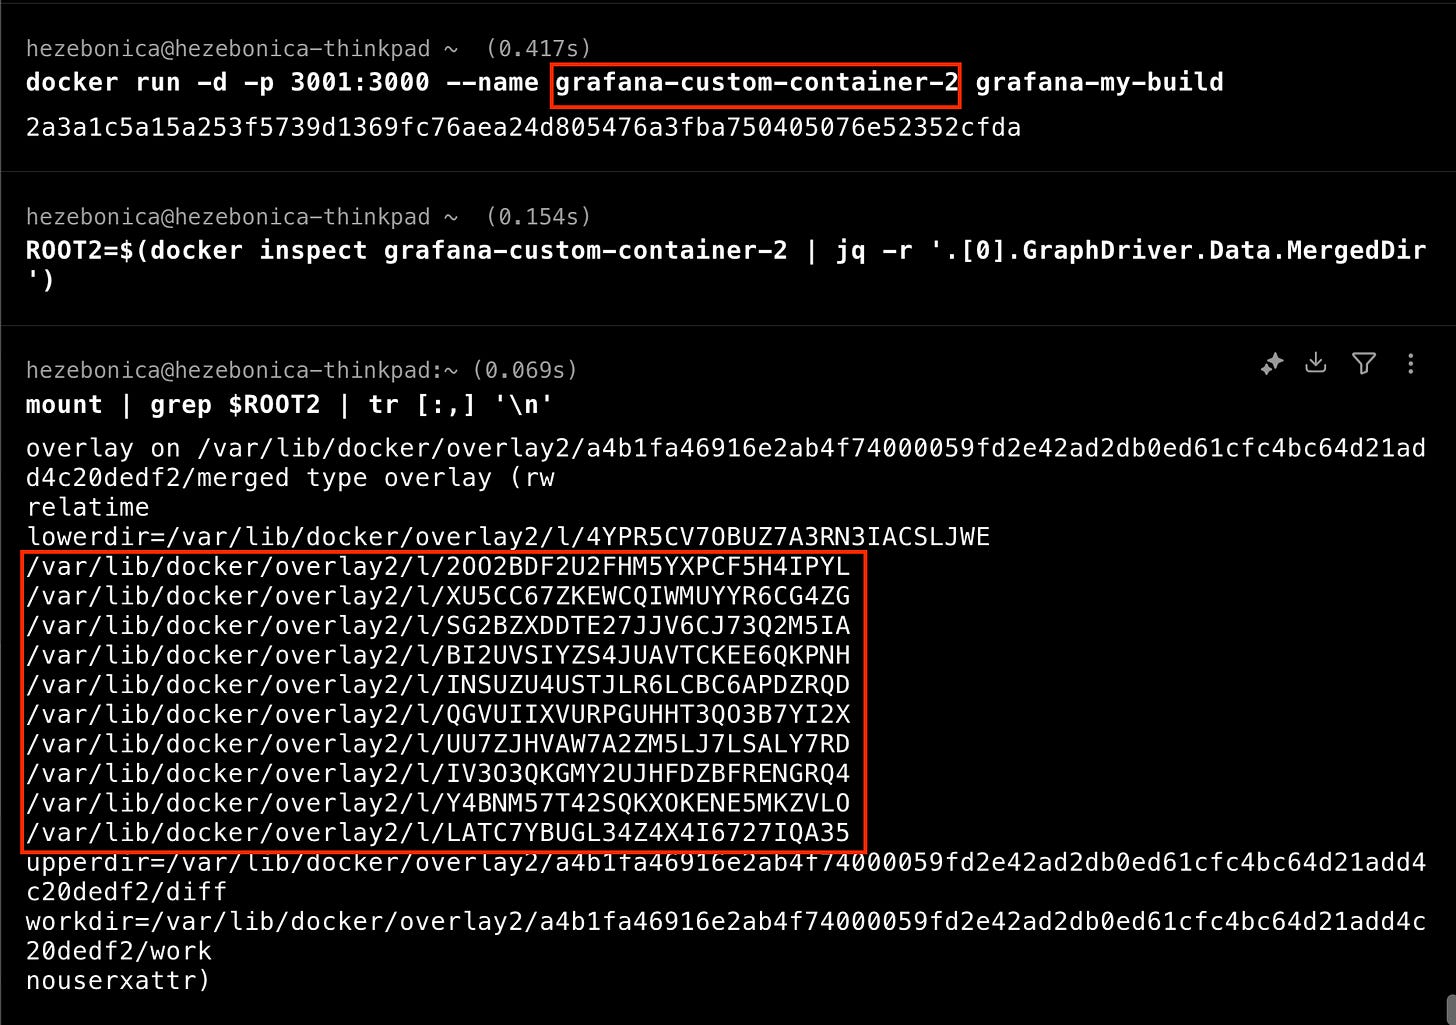
The graphdriver reports that 11 layers of lowerdir been combined with the upperdir. The graphdriver also reports on the location of the layers on the host. If we start a new instance of the container, we see that the exact same locations on the host are being re-used as the layers of the lowerdir, but that each container has its own upperdir where changes are made.
So What ?
The layered architecture of container images and the way the overlay filesystem combines layers at runtime has both positive and negative implications for the security of container images. First, let’s get the bad news out of the way. Because a deletion in an upper layer does not actually remove a data from a lower layer, we need to careful about how we store secrets while building images. It would be an exercise in futility to include private keys to an external system in a build step and then attempt to remove it by deletion in a subsequent step. Several open source tools like Trivy and Gitleaks will happily search container images for exposed secrets included during build. There are a variety of ways to avoid accidentally including secrets in images, including mounting secrets with Docker BuildKit.
On the positive side, we can take advantage of the layered architecture of container images to secure container images at scale in an enterprise context. Typically, a central platform engineering team will produce and maintain a gold container image that application teams can build on top. If this gold image is built and configured in a secure way, with continuous patching and updating, all of the containers that build on top of it are made more secure without each application team needing to duplicate the effort of building a secure images from the ground up!
References
- Julia Evan’s blog on overlay filesystems
- Container Security by Liz Rice, Chapter 6 Container Images
- The Book of Kubernetes by Alan Hohn Chapter 5 Container Images and Runtime Layers
- Linux kernel documentation on overlay filesystem
- Storage Drivers in Docker: A Deep Dive
- What are containerd’s graph drivers
- Graph Driver Architecture — Moby Project Wiki
- Container Images & Security 101: 5 Need to Know Facts — CloudNative SecurityCon 2024
- Understanding Image Layers — Docker Docs
Container isolation is weak compared to a vritual machine. The host still has full visibility into the container’s process(es) and certain vulnerabilities may even allow jumping from the container to the host, a so-called container escape.
The most common ways to arrange images are the Docker image format and the OCI image format.
Skopeo is an open source tool for manipulating container images and image repositories.
The OCI format makes images to be interoperable with systems beyond just Docker. The latest Docker image formats are OCI compatible.
A tar gzip is a compressed archive file that combines two separate tools, a tape archive or tar for bundling multiple files and directories into a single file called a tarball and GNU p or gzip for compressing files to reduce their size.
The directives that will modify the filesystem include FROM, ADD, COPY, and RUN.
Copy-on-write is a general technique for resource management in programming that I found quite fascinating reading about. See this article if you care to learn more about it.